Showing posts with label createprintables. Show all posts

Tuesday, December 1, 2015

DIY Christmas Card + Printable


Every Christmas, I try to send out some Christmas cards to family and close friends.
I don't tend to like buying cards at the store because it feels less thoughtful to me, however making twenty-something individual cards is just too time consuming.  
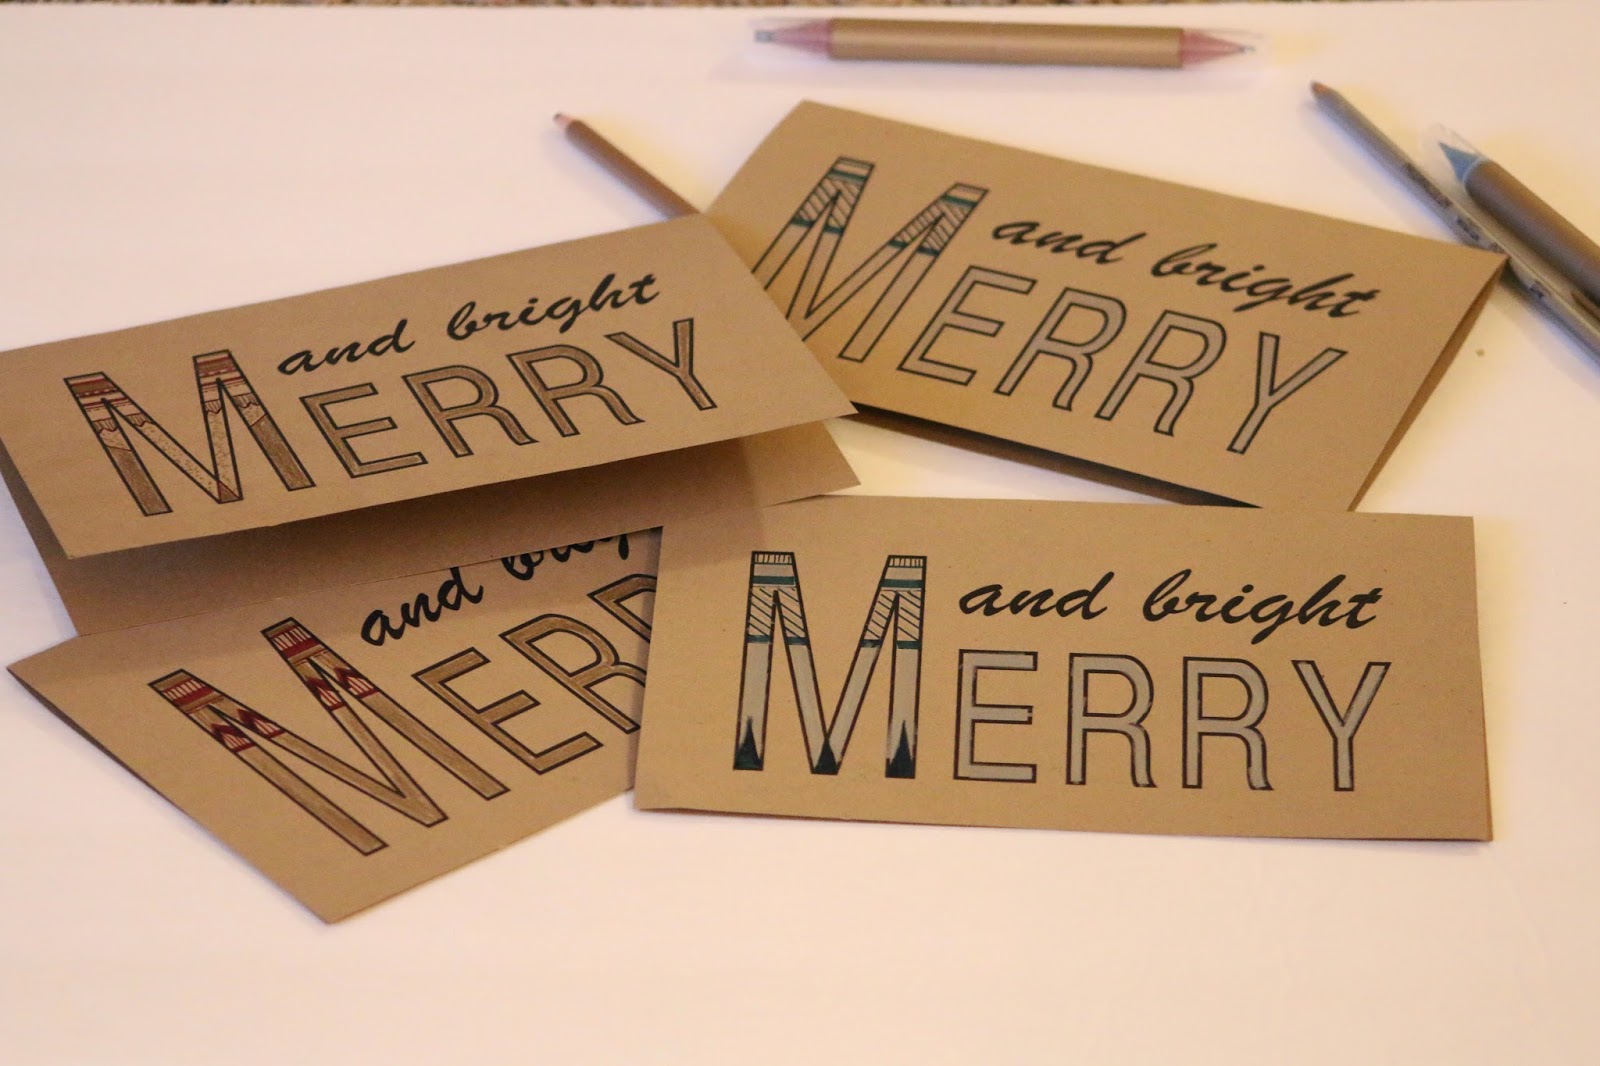
Last Christmas, I decided to put my creativity to the computer about 6 handmade cards into the season.  I still made all of our cards, but this time I could mass produce the results much more efficiently.

After I designed the card, I printed it on craft colored card stock in black ink.  Printing the inside message is as simple as flipping the paper over and printing on the other side - unless you have a fancy printer that does the flipping for you.


Using the open source program Scribus, I took the design from one of my hand drawn cards and put it into effect on the computer.  It was very simple text placement, but allowed me to make some small handmade changes to each card to still give it a handmade approach.
Handmade Inspiration

 Card in Scribus with Hand-Drawn Details

Interior card message.

  Using a straight edge, markers, and prismacolor pencils, you can use this generalized card to put some handmade touches to all of your cards.


Adding those embellishments are as easy as this - just make a mixture of horizontal, vertical, thick, and thin lines.


I tried to stick with Christmas or winter colors like reds, greens, blues, silver, and gold in the colors I used.  Let Christmassy patterns inspire you like candy canes, Christmas sweaters and snowflakes.


This year, maybe you're like me and like to add some handmade touches to your cards, but don't want to design them yourself?  You're in luck, because you can print this card for free at your home!


Below are two links, one for the front, the other for the inside of the card.  
Link to Merry and Bright Card FRONT
Link to Merry and Bright Card INTERIOR
I hope the printable will serve you well, and get your creative juices flowing this holiday season!  Or maybe even hand it off to the kids to make and send out!
Merry Christmas!
post signature

Saturday, September 13, 2014

DIY Vellum "Fall" Banner with Printable


One of my favorite places in our apartment to decorate seasonally is our living room window.  It is really a main feature of the room, and really I find myself looking out the window more than anywhere else in the room.  I thought this would be a nice place to hang a seasonal banner.

Since a lot of light comes through the window, I decided to try using vellum - a semi translucent paper - to print a banner on.  I wasn't sure what effect this would have on the colors at first, but I think the light made them seem even more vivid, as well as the banner as a whole becoming more noticeable as a result of the back light from the window.

Oh, did I forget to mention that the weather in Oklahoma this past week has been unbelievably cool and Fall-ish?  It has been GREAT!  


To make your own banner, let's start off with the essential supplies.
You'll need 8.5 x 11 sheets of vellum paper, a single hole punch, a pair of scissors, one roll of ribbon in your choice of color, and optionally a paper cutter.  Of course, you can always use scissors and a straight edge in lieu of that.

If you want to print the same banner I used, click here for download.


First, print out the "Fall" Banner that I've uploaded to google drive for you to use.

If you want to make your own, my tips are to use a thick font and add a medium to thick outline on the edge of the letters in a slightly darker color.  It is super easy to do in Microsoft Word, and you can just center your letters and make the size so that there is one letter per page.  I made the letters around 400-500 points, depending on font.


After you've printed your banner, the first step is to cut an 1.5 inches from the top of each page.


Next, fold the page in half, only creasing from about half an inch below the letter and downward. 


If you feel uncertain of your straight cutting abilities, draw a line from the top of the crease toward the bottom corner.  Then cut along that line so that when you open the page back up you have created an upside-down 'v.'


Cut all your letters and put them in a single (or multiple) stacks - depending on the sharpness of your hole punch and the thickness of your stack of papers.


 My hole punch is pretty new and didn't have a problem cutting through four pages at once.


Almost done!
Now lay the letters out in order, and grab your ribbon!


Thread the ribbon through the holes on the pages. 
I personally think it looks best to thread it from the back so the majority of the ribbon is in front of the paper.


Center and space all your letters on the ribbon, and its almost ready to be hung!
Just tie your banner up somewhere or use thumbtacks to hang it!
(Just a hint, this vellum looks great in a window!)


 Loving my 'happy' banner by Oh Joy from Target!  
Love that she is a blogger too - and seriously she has the cutest kid.

HAPPY FALL!


Like what you see?  One more time I'll post the LINK for you!

The download is via google drive, but I set it so that anyone can view, you shouldn't have to have an account.  Let me know if you have any problems!
In regard to this wonderful season, I have a question that I often wonder that I'd like to ask:
In your everyday speech, do you refer to the season that precedes winter as "autumn" or "fall?"

post signature

Friday, November 22, 2013

"Meet Me at the Mistletoe" Calligraphy Sign with Printable


Before we get into this really easy DIY, I want to show you my inspiration.  Many of my Christmas ideas start with Christmas songs...only because I'm completely obsessed with Christmas songs.   If you want to know the honest truth, I am actually writing this post way back in September and, yes, I'm listing to Christmas music way back in September.  I'm probably listening to Christmas songs right now, too.

I discovered this song while I was studying abroad (also the time Tyler and I were separated by 8,063 miles for 6 months).  Dave Barnes' Christmas songs are very cozy, homey, and warm - and most definitely romantic.  I think in that time, this Christmas album brought me a little bit of home and a little bit of the same feelings I would have normally felt in America at Christmas with Tyler.  Two years later, these songs still make me feel the same way...and I love them!


 I love how in the song, the couple wants to be together, but their friends are all over for a Christmas party.  They're having a great time hosting the party, but they want some alone time for just a second.  That's when the boy wants the girl to "meet me at the mistletoe."  I love the idea that couples remain attracted to each other, and want that little time together.  Because, seriously, let's face it...Christmas time blows Valentines Day out of the water on the romance scale.  (I might even venture to say that it is such a gaudy holiday that it isn't even romantic...but obviously it just isn't my favorite holiday.)  That's why I wanted to make a decorative "meet me at the mistletoe" sign for Christmas.

In my mind, I'd initially wanted to make this a rustic pallet board project.  I started to paint it on and I thought the lettering looked disastrous.  I gave up, and decided to do something on paper with my calligraphy pen and colored pencils.  I love colored pencils.
(After I finished this drawing, I went back to my pallet board sign and found a way to fix it - so now I have two "Meet me at the Mistletoe" signs.)

Now, obviously I don't really know how to write calligraphy.  I faked it as much as possible, and I think it turned out okay.  (I would love to learn, though!)  I'm an artsy person, but I generally have awful handwriting.  This one is pretty good for me.

I made some little mistletoe branches on each side of the quote.

After I drew the design and traced it with the calligraphy marker, I used my PrismaColors to shade in the leaves and berries.
Seriously, PrismaColors are the best colored pencil brand.  Hands down.  I wouldn't have a life without them.  I don't know if you read this, but thanks Mrs. Cox for giving them to me for graduation all those years ago!

I had an old beat up frame that I decided to make look like it had been purposefully distressed by sanding.  I thought the black would be the best border for this picture, so I used this particular frame.  I'm really liking how it turned out.

Christmas warmth and festivity with the glowing lights...yeah, meet me at the mistletoe.  ;)

Finally, I found the place for my sign, above the window that goes between our living room and kitchen!


And what's the best news of all about this post?  You can print one just like this for free!


Here are your links to the printable!
5x7 Meet Me at the Mistletoe Printable
8x10 Meet Me at the Mistletoe Printable

In case you missed my Thanksgiving printable from a few weeks ago, they are all designed to fit into one frame so all you have to do when a new season comes around is switch the print.


Do you have any favorite quotes from Christmas songs?  Are you solely into the traditional songs, or do you like the contemporary songs too?


Monday, November 11, 2013

"Give Thanks" Free Printable and Decoration


Today, I'm showing you the beginning of what I'm hoping will be a year long project I've been working on to celebrate each holiday in one decoration.

I came across an old 5x7 frame that I sanded down.  I wanted to have some seasonal decoration in our home, but I didn't want to have to change the piece that was on the wall every time.  That's when I decided to make a new drawing to fit in the same frame for each holiday or season.  I started with Christmas (which you'll finally get to see here in a few weeks), and last week I finished Thanksgiving.  

I have been using Bristol Vellum - I like that it is smooth to work with, but is a very sturdy paper.  
Using pencil first, I tested out the fonts I wanted to use and wrote them with a calligraphy pen.  I colored in the "thanks" with orange colored pencil.


The difficult part was figuring out how to make the foliage frame the font and still look whimsical.


After drawing everything out with pencil, I outlined with a fine point sharpie, and colored in with colored pencil.


And here's my "Give Thanks" sign in the frame!  Now, all that's left is to figure out where to hang my frame!

So from my hands to yours (literally), I decided to scan and edit my accidental coffee stain off the paper so you can hang this up in your home!  This printable is set to print as a 5x7.


This will be my first printable, so let me know if you have any suggestions for making the downloading experience better!  Please be aware that because this was originally hand drawn, the pixilation and imperfections will be more than a computer generated printable.


Copyright 2012-2014 Saxon Smith (Let's Drink Coffee, Darling). All rights reserved.
Related Posts Plugin for WordPress, Blogger...
UA-49062203-1