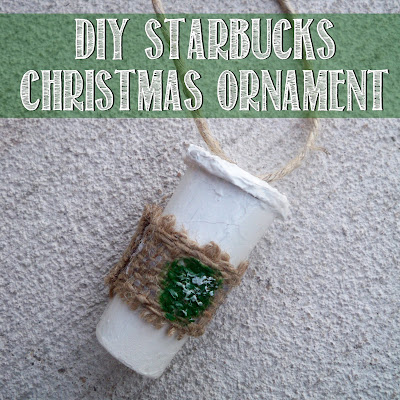
Have you ever gone into Starbucks during Christmas time and looked at the adorably expensive ornaments for sale while you're waiting on your coffee? Well, if you're like me, you've wanted one for several years but haven't bought it due to the price.
This year I decided to put an end to my lack of a Starbucks ornament, and decided to make my own! It isn't exact, and it is definitely more...let's call it "rustic," but the general essence is the same, in my opinion.
It was actually fairly easy, and I'm giving you a pattern that you can print out to make it even easier for you!
Here's what you'll need:
- Download and print a copy of the stencils and instructions.
- Flexible cardboard (like cereal boxes) or heavy card stock.
- Pen or Marker.
- An x-acto knife or scissors.
- A hot glue gun.
- Paint (white and green, or preferred colors).
- Burlap, Twine, Cardboard, a Used Starbucks Sleeve
- Twine, string or wire to hang the ornament.
First, gather your supplies - most importantly your pattern with instructions, pencil and cardboard. I used a recycled cereal box because the weight of it was sturdy, but still flexible. Plus, recycling is good - and free! Trace the stencils onto the cardboard and cut the pieces out!
After you've cut the pieces out, you will start by gluing the two edges of the piece labeled "cup body" together. Make sure you glue it evenly, or the top might not turn out bigger than the bottom to give it the look of a cup rather than a can.
After the glue has dried, take the piece labeled "bottom support" and glue it inside the bottom of the cup body.
This is important, because not only is this the base of your cup, but it adds the crucial strength that will prevent your cylinder from bending in the future.
Repeat the former step, only with the "top support" piece.
For the lid, you'll cut out three circles of identical size and glue them together to create a really thick pace.
After you glue them together, center them on the top of your cup.
On top of the flat lid peices, you'll glue the two crecent shaped peices (titled 'lid 4' and 'lid 5' in your instructions) to the edge of the cup. This gives the illusion of the cup's lip where the drink comes out.
I tried to use hot glue to smooth everything together so you wouldn't notice the jagged edges from the cut cardboard. It helped a little, but as you can see, things are still jagged. Let me know if you have better suggestions!
I used white spray paint after I smoothed everything down with glue.
After spray painting, I glued a strip of burlap around the mid-section of the cup to look like a Starbucks sleeve. You could also use twine, cardboard, or an actual Starbucks sleeve.
Here is the cup - generally finished! After this, it's all up to you and your own creativity!
I love that this ornament is still very "handmade" looking, yet how it gives that coffee essence.
I added three last steps to my ornament: gluing a piece of twine to the top for hanging, painting a green circle, and adding spots of white to the green circle to mimic an actual Starbucks sleeve.
Here's the finished product!
I can't wait to have this hanging on my coffee themed Christmas tree this year!
Oh, and I almost forgot to include one picture on the tree!
If you're ready to start this project now, click HERE to print the pattern and instructions!


Cute!
ReplyDeleteThanks Erica!
DeleteYou have a coffee themed Christmas tree? Now that's dedication! This is really cute!
ReplyDeleteThanks Rachel! This will be my first year to have one! Between Tyler and I we somehow have 3 Christmas trees - two small ones and one big one. I put one of the small ones by our coffee bar and it will have mostly coffee themed ornaments!
DeleteOh my goodness! That turned out adorable!!! :-)
ReplyDeleteThanks Susannah!
DeleteI have not noticed them yet (mainly because I am pretty unobservant) but this is adorable! What a great idea:)
ReplyDeleteVisiting from Monday Mingling!
Cheers,
Alyson
I haven't seen them out this year yet, but I saw them out for Christmas 2011 and 2012. Thanks so much for stopping by, and for your sweet comment! :)
DeleteThat is too cute! Very creative. I'm impressed!
ReplyDeleteVery cute! My favorite ornaments are ones that are handmade.
ReplyDeleteBonnie @ Our Secondhand House
Thanks Bonnie! Handmade does have that special touch. :)
Deletethat is too adorable! i think i may have to make me one of these :)
ReplyDeleteIf you do, let me know how it turns out! I made the template based on the one I made, but I haven't actually made another one yet. I'm thinking about making a red cup one though.
DeleteThat is awesome! My best friend would love this! Thanks for sharing at Share Your Stuff Tuesday!
ReplyDeleteJenn @ IHeartHandsOn.blogspot.ca
Thanks Jenn! I'm glad to have found your party! :)
DeleteThis really is super cute!!! I love this. Handmade things are just so much better and fun too
ReplyDeleteThanks Rebecca! Yes, I love the look of handmades vs. store bought! The memories are so much stronger too! Thanks for stopping by!
DeleteIt's Deonna from the Child at Heart blog! Thank you so much for linking up at the Merriest Blog Hop! I can't wait to see all of your holiday ideas this month! Haha this is so cute! I'm smiling just looking at it. My husband would love this!
ReplyDeleteThanks Deonna! Maybe you can try making him one! ;)
DeleteThis is a cute idea - I might give it a try for my tree as I'm a huge Starbucks fan.
ReplyDeleteI'd love to hear about it if you give it a try! :)
Delete