Showing posts with label darlingweddingplans. Show all posts

Saturday, April 5, 2014

How to Make Beautiful Custom Maps

Do you love maps?
There are many reasons we might choose to have a map of certain places.  
It might be where we live, a place we visited and loved, or a map to use for a project.  You might want to print a picture of the place on the map where you or a friend got married, where you studied abroad, or your favorite vacation spot.  There are lots of reasons maps are cool, not to mention all the nifty map crafts that are popular right now.  
I wanted to show you my favorite website to go to when I want to make a map of something.  It is called maps.stamen.com, and it is a really versatile FREE website where you can choose anywhere on earth to make a map.  It even will create an image that you can save that is up to 2000 pixels.
This website is also perfect if you are designing your own wedding invitations and want to include a map.  (I just kick myself every time for not knowing about this website when I was still making my invitations!)


Okie dokie, are you ready to get started making your own map?!
Go to maps.stamen.com and it will bring you to this page.


Use the search box in the upper left corner to type in the location of which you would like to make a map.  You can change the type of map by clicking the two previews on the right side, or choose from even more map styles by scrolling down.


I chose Oklahoma City, because that's where I live.


It was originally set on terrain, but I decided to switch to toner.  Toner would be the PERFECT way to make maps for wedding invitations.  Literally, it would be just perfect.


You can also zoom in and out using the yellow buttons under the search box.  I decided to get a little closer.
To get rid of the previews for other maps, click the yellow button in the bottom left right beside the current map style you have chosen to get rid of them.  This also opens up the ability for you to make an image of a specific location or embed the map onto a webpage.


I want to create an image, so in the upper right corner I clicked <image>.  


Doing so brings you to this page, where you can set the size and proportions of the picture.  You can also change map styles here.  The yellow box shows you the constraints of your map, and you can drag the map around until you get exactly what you want inside the yellow box.


Once you adjust all your settings, you can click "Make" in the upper right corner.  It will begin to process your map image, which sometimes takes a little while.  When it is done, you can click the map in the top of the queue on the right.  


After you click your map, it will bring you to this page where you can right click and save it.  


Here's how my map of Oklahoma City turned out!  


This map is another one I made of Oklahoma City in the terrain style.


One of my favorite settings to make maps with is the watercolor style.  They are just simply beautiful.  I made a map of the neighborhood I lived in while studying abroad.  I just love the colors, it is so pretty!


 I can't even name all the wonderful possibilities you can do with Stamen Maps, but I have lots of ideas that I'd eventually like to use it for.  


Do you like to use maps in your decorations?  Or are you wedding planning and needing a beautiful way to send a map in your invitations?  I hope this little gem is helpful to anyone else who loves travel, maps, and beautiful images!
post signature
I would like to note that I am not being compensated in any way, nor have I been contacted by Stamen maps.  I just really love their website and want to share!

Wednesday, December 18, 2013

Guest Posting Today at Happily Ever Crafter!


Today I have a guest post lined up over at Happily Ever Crafter!  


If you've been missing my wedding posts, this will be one of the last (or maybe the very last) post about my wedding!  It is an informative one too, talking about how we catered the wedding ourselves!  You won't want to miss it, so check it out HERE!  :)


Catherine also has a great Wedding Wednesday series going on with tons of great advice from many different bloggers, so any ladies out there who are wedding planning should definitely check out her blog!


Wednesday, October 16, 2013

Our Wedding Music


This week, I wanted to talk specifically about our wedding music.  I'm going to be completely honest and say that I was inspired when Joelle shared her wedding music with us a few weeks ago.

I put a lot of time into picking pieces that would be timeless to us and guests in most aspects, and that were really meaningful.  Oh, and did I say that I spent forever working on the music details?  I should at least be able to brag about it.  

And thanks so much to my matron of honor's husband for doing all the music and sound stuff for us at the wedding...it took a lot of work!

Ceremony Music

PRELUDE
Guests were seated to a small compilation of classic and jazzy songs.

Mello as a Cello - The Big Broadcast, Vol. 1 by Joe Venuti & His Blue Four
Camulonincapoop - Up (For Your Consideration) by Michael Giacchino
Thank Heaven for You - The Big Broadcast, Vol. 1 by Rudy Vallee 
Up with End Credits (3:19-5:15) - Up Soundtrack by Michael Giacchino
Dining Room Source - Up (For Your Consideration) by Michael Giacchino

PROCESSIONALS


Grandparents, Parents and Wedding Party

Up with End Credits (beginning repeated) - Michael Giacchino


Bride's Processional

Carl Goes Up - by Michael Giacchino


Recessional

I'm Gonna Be (500 Miles) - by The Proclaimers


Reception Music

BACKGROUND MUSIC 
(Throughout Reception)
For this portion of the music, we broke away from the jazzy theme somewhat to use songs we like that were meaningful.  Expecting to open a dance floor, we had narrowed down the list from about 30 songs to 10 songs, so when we didn't dance to anything but the first dance, those songs started repeating pretty frequently.  So my advice, put more on than you think you'll need!


I won't list them all, but some of my favorites were Life in Technicolor, The Moon Represents My Heart, Easier to Be, and I Have and I Always Will.

FIRST DANCE

My Girl - by Dave Barnes


Not having a DJ meant we could change our plans if we wanted to.  And we did.
We had planned an entire playlist of dance music (that may or may not have included this awesome song and dance that has been played many times during late night study sessions) but when the moment came to whether or not to start the dance floor, it just didn't feel right.  I think it could have been fun, but we really liked how the night ended up going without forcing it.

Side note:  if you skipped the link that says "this awesome song and dance" then go back and click it.  I'll even give you another link to go watch it.  Wouldn't that be awesome on a crazy wedding dance floor?  I think so.

----

I love the music we chose for the wedding and I still listen to my playlists all the time!


Tuesday, September 10, 2013

Wedding Cake, Cupcakes, & Cake Cutting


Today's post is about our wedding cake, cupcakes, and cutting the cake!
We used Christina's Cookies and Cakes out of Sulphur, Oklahoma.  
Christina came to set everything up, and I must say I was amazed by how great it looked and tasted!

Enjoy, and don't lick your computer screen.  It'll give you the wrong impression.

We had a small wedding cake with lots of cupcakes!
We had Lemon, Red Velvet, Cherry Cheesecake and Chocolate with a Strawberry on Top cupcakes!
Chocolate Covered Strawberries on Chocolate Cupcakes!  Yum!

Thank you Christina's Cookies and Cakes for the delicious cake, cupcakes, and for setting up!  It was all wonderful!

We love the texture Christina put on the cake!  It went great with the succulents and cake toppers!

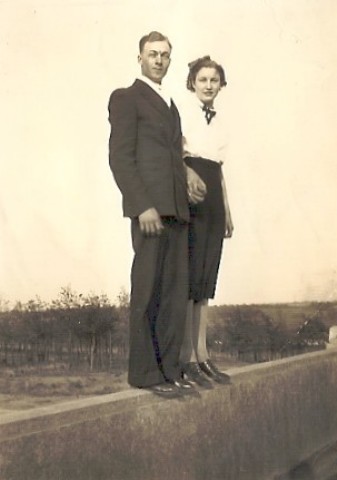
These little cake toppers have a wonderful little story.  They belonged to my great grandparents, Leona and Kermit.  My grandma told me they were used at Kermit and Leona's wedding. They were married on June 19, 1938.  That means these two figurines were at least 75 years old at the time that they were used again during my wedding.  

A photo of my Great Grandparents before they married.

I made the decorative piece below our cake using wedding pictures or young pictures of our grandparents and parents.  From the outer edges are our grandparents, leading to us in the middle.  We would not be together today if it were not for our families and heritage!

Thanks to mom for making the awesome wooden cake stand as well!

 The Cake Cutting

Cutting the cake!

My 'oops,' 'crap,' 'oh no,' and 'oh well' face all rolled into one when I realize that I forgot to tell Tyler that we're supposed to save the top layer for our anniversary.  We just made up for it by eating all the leftover cupcakes on the honeymoon.  :D  Love you anxiously hungry for wedding cake hubby! :)  

Yep, you know what I'm thinking.
Do you see this??
He is literally chasing my hand with his face because he thinks I would shove it in his face if he didn't catch it first.
He was right, but he made it too difficult, so I ended up being nice.
That wasn't my plan, just FYI.
Of course he is nice.  He's always nice.
See, nice.  I was nice.  I. Was. Nice.

Yum.  I hope we can go get some cupcakes from her bakery on our anniversary!
Cake is good.  Really good.

Marriage is okay too.  ;)


A big thanks to Birds and Coffee Design for capturing all the photos from our wedding day!

Tuesday, August 20, 2013

A Bride and Her Dress


Today, I'm showing you the photos of my beloved wedding dress!  First I'll show the detail photos of the dress, and then my bridal portraits.  

At the bottom of this post is a story about where I found my wedding dress, and the process of the alterations.

Enjoy!


The Dress Details

My dress was built with two layers - a polyester lining in an ivory fabric, and a white lace overlay strung with beads and sequins.  The top half of the back was sheer lace. 


The wedding veil was handmade in a combined effort of me, my mom and my mother-in-law.
It has its own post and special story!  Click here to read it!


The Accessories

Gold brooch, used in veil and hair.  Had a matching brooch that my mom wore.
My 'Something Blue'
An old necklace that once belonged to my great great aunt.
Pearl Bracelet was a gift from my Mom.
My 1930s Art Deco Engagement Ring from Tyler.
Gold Jelly Pop heels with wide base on the heel since it was an outdoor wedding.
I'd originally planned to wear flats, but my dress was a couple inches too long, and was cheaper to by heels than to have the dress hemmed.


 The Bride


The Dress Story

Here is the story behind my wedding dress, for any ladies who are interested.

I didn't buy my wedding dress like most girls - by going in a shop, trying on several dresses until I found 'the one.'  No, it was actually quite different.  After not liking either the price or the look of every single dress I tried on in the bridal stores, I turned my gaze toward the internet.

I searched online boutiques first, like Etsy.  I researched having custom dresses made.  Then I stumbled on a website called Helene Bridal - it is a wedding dress company out of Suzhou, China.  There, I found the dress I would wear for my wedding - which had most of the features I was looking for in a wedding dress at a much cheaper price.

When I saw the dress, I knew I liked it.  But it was difficult to actually purchase a dress online when I knew I wouldn't be able to try it on, I wasn't really sure about the quality, and I hoped the shop was legit.  Having lived in China, I felt somewhat connected and wanted to chance it.  I had Tyler take my measurements, and I sent in my custom order (because I wanted a few changes made to the dress from the original design).

A month later, my dress came in.  I was in contact with the shipping man the entire day, and was anxiously awaiting his arrival - hoping he didn't come before I got off work, and hoping he got to my place before I had class.  I asked my roommate to stay at home as long as possible while I wasn't home - just NEEDING to make sure we got the dress THAT DAY.  I ended up having to miss class to get my dress that day, but it was so worth it.  Waiting one month to finally get to try on the wedding dress you'd already paid for was nerve racking!

When I tried it on, I was a little dissappointed.  It was much too big in the chest, shoulders, sleeves, and hip areas.  The only part that really wasn't too big was the waist.  When I bought it, I was certain I'd have to make some alterations, but figured it was fine since you have to do that with dresses you buy in bridal shops locally as well.  However, I didn't realize how extensive some of the alterations I would need were - and how many people either refused to do those alterations or wanted to charge me more than they should have.

After months of searching, and wondering if I would have to end up buying a completely different dress, or having a wedding dress I didn't like, I finally found Formal Fantasy in Stillwater, OK with prices that seemed reasonable.  I emailed their owner, Stacia, and she agreed that she could work with me on the alterations I needed.  Although the drive was pretty far from where I was, it was worth it.  

In the end, Stacia altered my sleeves, took up the shoulders, tightened the chest, added more boning, and took in the hips.  I think she did all the alterations with fantastic craftsmanship, and for a great price.  Anyone looking for alterations in Oklahoma should look no further.  

I was not as pleased with the bustle, which by the end of the first dance didn't look too great.  However, after the first dance the bustle wouldn't stay up anyway...which makes me glad because I'm pretty sure my pictures are much better without it.  Sometimes things just work out for the better!  If I would have done anything over with the dress, I would have had it bustled by a different woman who had shown me a bustle that I fell in love with prior to going to Formal Fantasy.  


In the end, my dress may have been a little more stressful than most girls, but even after $130 in alterations it was still cheaper than any of the other dresses I'd tried on in the stores.  I love how it turned out - just took a little TLC to get it there.  :)


All photos credited to Birds and Coffee Design.

Copyright 2012-2014 Saxon Smith (Let's Drink Coffee, Darling). All rights reserved.
Related Posts Plugin for WordPress, Blogger...
UA-49062203-1